

Optimizing your WordPress website is essential for improving page load speed, enhancing user experience, and boosting SEO rankings. One of the most effective tools for this is the LiteSpeed Cache (LSCache) plugin. In this guide, I will walk you through every step, from installation to advanced optimization, so your WordPress site runs faster than ever.
1. Why Use LiteSpeed Cache for WordPress
LiteSpeed Cache is a powerful caching plugin that offers:
- Page caching for faster load times
- Database optimization
- Image optimization and WebP conversion
- Minification and combination of CSS/JS files
- CDN integration for global performance
It’s compatible with all WordPress themes and works especially well with LiteSpeed servers, though it also functions on other server types.
2. Installing and Activating LiteSpeed Cache
- Log in to your WordPress dashboard.
- Go to Plugins → Add New.
- In the search bar, type “LiteSpeed Cache”.
- Click Install Now, then Activate.
Once activated, a new LiteSpeed Cache menu will appear in your dashboard.
3. Configuring General Settings
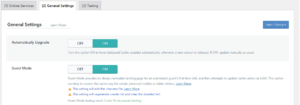
Navigate to LiteSpeed Cache → Settings → General. Configure the following:
- Enable LiteSpeed Cache: ON
- Cache Logged-in Users: OFF (unless needed for membership sites)
- Cache Commenters: OFF (optional)
- Cache REST API: ON
- Cache PHP Resources: ON
Save changes before moving to the next step
4. Enabling Cache Settings
- Go to LiteSpeed Cache → Cache.
- Enable the following:
- Enable Cache: ON
- Cache Mobile: ON (for mobile users)
- Cache Login Page: OFF
- Cache Commenter Pages: OFF
- Set Cache TTL (Time-to-Live):
- Public Cache TTL: 604800 (7 days)
- Private Cache TTL: 1800 (30 minutes)
Save changes.
5. Optimizing Images with LSCache
- Navigate to LiteSpeed Cache → Image Optimization.
- Click Start Optimization to compress images automatically.
- Enable WebP Image Format for lighter images.
- Turn on Lazy Load Images so images load only when users scroll to them.
This improves load times, especially for image-heavy sites.
6. Optimize CSS, JavaScript, and HTML
Optimizing CSS, JavaScript, and HTML reduces file size and improves page speed, Core Web Vitals, and user experience.
Steps:
Go to LiteSpeed Cache → Page Optimization → CSS / JS / HTML Settings.
CSS Settings:
- CSS Minify: ON
- CSS Combine: ON
- Generate UCSS: ON
- UCSS Inline: ON
- CSS Combine External + Inline: ON
- Load CSS Asynchronously: ON
- CCSS Per URL: OFF
- Inline CSS Async Lib: ON
- Font Display Optimization: ON
JS Settings:
- JS Minify: ON
- JS Combine: ON
- JS Combine External and Inline: ON
- Load JS Deferred: Deferred
HTML Settings:
- HTML Minify: ON
- Inline CSS Minify: ON
- Inline JS Minify: ON
- DNS Prefetch Control: ON
- Remove HTML Comments: ON (leave “HTML Keep Comments” blank)
- Load Google Fonts Asynchronously: ON
Optional: DNS Prefetch, HTML Lazy Load Selectors, HTML Keep Comments, DNS Preconnect (only if needed).
Note: Avoid changing other settings unless you know what they do, to prevent site issues.
7. Browser Cache and Object Cache
Browser Cache: Go to LiteSpeed Cache → Cache → Browser and enable it to store static resources in visitors’ browsers.
- Object Cache: Go to LiteSpeed Cache → Object and enable it to reduce database query times.
These options make repeat visits faster.
8. Set Up the QUIC.cloud CDN (Optional)
QUIC.cloud is a CDN by LiteSpeed that caches content globally for faster delivery. Pairing it with LiteSpeed Cache can significantly improve page speed.
Steps:
- Prepare Cloudflare:
- Ensure your site uses Cloudflare. QUIC.cloud handles dynamic content, Cloudflare handles static content.
- Request Domain Key:
- Go to LiteSpeed Cache → Settings → General → Request Domain Key.
- Wait, then refresh the page to auto-fill the key.
- Link to QUIC.cloud:
- Click Link to QUIC.cloud and register (or sign in).
- Confirm your email to complete the setup.
- Enable QUIC.cloud CDN:
- Go to LiteSpeed Cache → CDN → QUIC.cloud and switch it ON.
- Connect Cloudflare API:
- Obtain the Global API Key from Cloudflare.
- Enter your Cloudflare details in LSCache CDN settings and click Save Changes.
Pro Tip: Once connected, you can flush LiteSpeed, Cloudflare, and server caches in one click from your hosting panel.
9. Advanced Tuning Options
- Database Optimization: Clean post revisions, trashed posts, spam comments, and transients.
- Critical CSS: Auto-generate CSS for above-the-fold content.
- Heartbeat Control: Reduce WordPress heartbeat frequency.
- Crawler Settings: Preload dynamic content if needed.
These fine-tune performance beyond basic caching.
10. Testing Your Site Speed
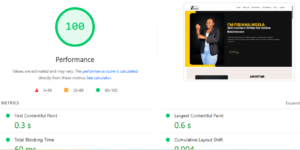
After optimization:
- Test on Google PageSpeed Insights for load times, FCP, and LCP.
- Use GTmetrix or Pingdom for additional metrics.
- Clear cache before testing to ensure accurate results.
Conclusion
Using LiteSpeed Cache with proper settings, CSS/JS/HTML optimization, image compression, and optional QUIC.cloud CDN, your WordPress site will:
- Load faster on all devices
- Reduce server load
- Improve SEO rankings
- Deliver a smoother experience to visitors
Pairing LSCache with a quality host, CDN, and optimized images ensures maximum speed and performance.
A slow website can lose customers. Get in touch now for a free report on your WordPress store’s performance and start converting more visitors.

